In this article, I am going to tell you all-around details of a Startup folder like types of startup folder, the location of the startup folder, etc. Also, how you can add or remove the program from the startup folder. So without wasting any time let’s just start with this tutorial!!
Where is the Startup folder in Windows 10?
Make sure to create a restore point just in case something goes wrong.
Where is the Startup folder in Windows 10? Startup Folder Types Location of Startup folder in Windows 10 Startup Folder Shortcut Add a Program to Startup Folder Disable Program from Startup Folder
Startup Folder Types
Basically, there are two types of start folder in windows, first startup folder is a generic folder and it is common for all the users of the system. Programs inside this folder will also be the same for all the user of the same computer. The second one is user dependent and program inside this folder will vary from one user to another user depend on their choices for the same computer. Let’s understand the types of the startup folder with an example. Consider you have two user accounts in your system. Whenever any user starts the system, the startup folder which is independent of user account will always run all the programs inside the folder. Let’s take Microsoft Edge as the program present in the common start-up folder. Now one user has also put the Word application shortcut in the start-up folder. So, whenever this particular user starts his system, then both Microsoft edge and Microsoft Word will get launched. So, this is a clear example of a user-specific startup folder. I hope this example clear the difference between the two.
Location of Startup folder in Windows 10
You can find the location of startup folder through File explorer or you can access through “Windows Key + R” key. You can type the following locations in the run dialog box (Window Key + R) and it will lead you to the location of the Startup Folder in Windows 10. If you choose to find the startup folder through file explorer, then keep in mind that “Show Hidden Files” option should be enabled. So, that you can see folders to go to the startup folder. Location of the Common Startup Folder: C:\ProgramData\Microsoft\Windows\Start Menu\Programs\Startup Location of the User-specific Startup Folder is: C:\Users[Username]\AppData\Roaming\Microsoft\Windows\Start Menu\Programs\Startup
You can see that for the common startup folder, we are going into program data. But, to find the user startup folder. Firstly, we are going into the user folder and then based on user name, we are getting the location of the user startup folder.
Startup Folder Shortcut
Some shortcut key can also be helpful if you want to find these startup folders. First, press “Windows Key + R” to open the run dialog box and then type “shell:common startup” (without quotes). Then just press “OK” and it will directly navigate you to the common startup folder.
To directly go to the user startup folder, just type “shell:startup” and hit Enter. Once you hit Enter, it will take you to the user’s startup folder location.
Add a Program to Startup Folder
You can directly add any program from their settings to the Startup Folder. Most of the application has the option to run at startup. But, anyhow if you don’t get this option for your application you can still add any application by adding the shortcut of the application in the startup folder. If you want to add the application, just follow these steps: 1.First, search for the application which you want to add to the startup folder and then right-click on it & select Open file location.
2.Now right-click on the application, and move your cursor to the “Send to” option. From the list of options that appears, select Desktop (create shortcut) from the right-click context menu.
3.You can see the shortcut of the application on the desktop, just copy the application through shortcut key “CTRL+C”. Then, open the user startup folder through any of the methods explained above and copy shortcut through shortcut key “CTRL+V”. Now, whenever you start the computer by your user account, this application will automatically run as you have added to the startup folder.
Disable Program from Startup Folder
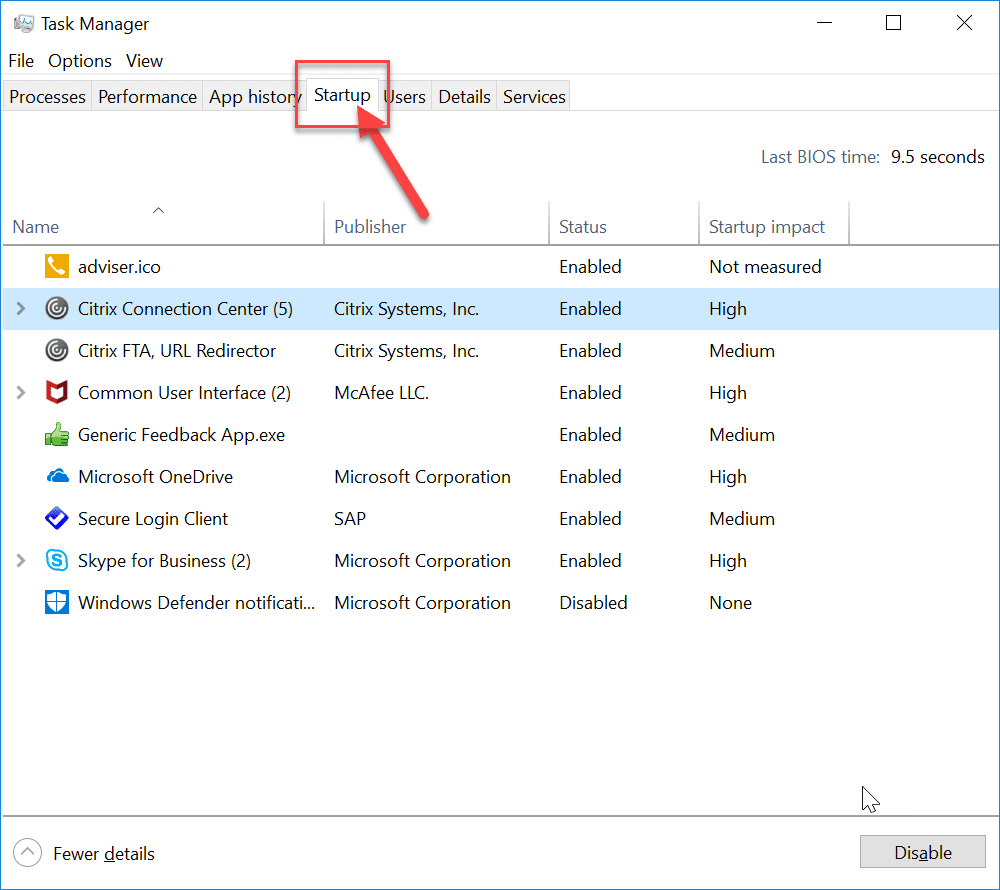
Sometimes you don’t want certain applications to run at the Startup then you can easily disable the particular program from the Startup Folder using the Task Manager in Windows 10. To remove the particular program, follow these steps: 1.First, open the Task Manager, you can do that using various methods but the easiest one is using the shortcut keys “Ctrl + Shift + Esc”.
2.Once the Task Manager opens, just switch to the Startup tab. Now, you can see all the application which are present inside the startup folder.
3.Now select the application you want to disable, click on the Disable button at the bottom of the task manager.
This way that program will not run at the start of the computer. It is preferable to not add an application like Gaming, Adobe Software and Manufacturer Bloatware at the startup folder. They may cause hinderance while starting the computer. So, this is all-around information related to the startup folder. Recommended:
How to View Saved Password in Chrome Create Fillable Forms in Microsoft Word Use Chrome Components to Update Individual Components How to Change the System Language in Windows 10
I hope the above steps were helpful and now you can easily Open Startup Folder in Windows 10, but if you still have any questions regarding this tutorial then feel free to ask them in the comment’s section.